Nowadays, I source the majority of my nail art inspiration on Pinterest. The feed is rich in options that are aligned with my style preferences (which the algorithm has really honed based on my pinning history). I follow a lot of nail artists and salons on Instagram, too, so I pull from there as well.
When I start noting a specific design across both Pinterest and Instagram, I know it’s a trend. Most recently, the design I can’t stop saving is a take on the French manicure, but instead of a thick white strip across the top, the white tip is razor thin and almost undetectable. My impulse was to label it a skinny French, but more respectfully, it’s called a micro French manicure.
What is a micro French manicure?
According to Rachel Apfel Glass, the founder of Glosslab, the micro French manicure is exactly what it sounds like: “The micro French manicure is a very subtle, understated take on the classic French,” she says. The only difference? “The line of polish is made much thinner than the typical one.”
The micro French is not a “brand new” design — it’s probably as old as the French manicure itself. However, Julie K, a celebrity manicurist based in NYC, asserts that public figures have carried the look back into the zeitgeist. “I think the micro French has been popular with celebs because they are always doing events and videos, and they need a nail that goes with many different looks, that isn’t a solid mani,” Julie explains.
Of course, the traditional French manicure is undeniably simple as well, which is why it’s become such a classic staple design. So, why exactly have we gone micro with it? “The trend is super minimalist, so that’s why many clients are opting for it,” offers Glass. “It’s a fun twist on the usual French and offers a design to those who want to keep things simpler.” Additionally, Jess Brush (@nailbetch on TikTok) says that the micro French is a great short-nail design because it adds dimension to the nail without looking heavy or making the nail appear shorter. On the contrary, the thin line actually elongates the shape of the nail.
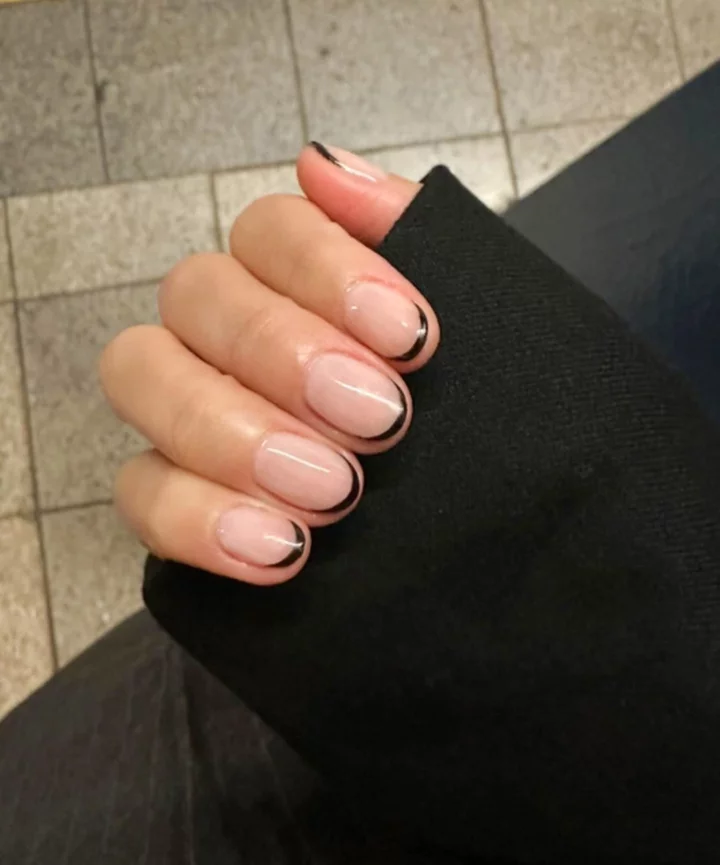
Black accents are a big fall nail trend, and a black micro French is undeniably chic.
How to ask for a micro French manicure
For my own micro French inspiration image, I used the above photo. I went to Glosslab for my appointment and my artist immediately recognized the style as a trending design. “Oh, the micro French has definitely been a trend,” they said as we got into shaping.
Here’s where I think I went a little off: When my artist asked if I wanted my length taken down, I said we could keep it as is. But my natural nails are pretty long. If I had a do-over, I would ask for shortened nails — so the free edge doesn’t extend past my finger — and rounded in shape.
However, I think I would find less issue with the long nail length if my base color was more full-coverage instead of completely clear. “Nail length can be short or long,” says Julie. “The important thing is that the base color — usually milky white or pink — has enough coverage to hide the natural smile line, where the pink nail bed and white free edge meet.”
So tl;dr: if you have a longer natural nail, make sure you use a base color in a milky white or creamy nude, which will even out the tone of your nail bed. If the polish is too sheer or translucent (in my case), you’ll be able to see the underside of your nail up close. You’ll mitigate this issue altogether if your nails are short.
As for the tip, I went for classic white. However, you can do any color you want. Both Julie and Glass say that their favorite iteration of the design is a micro French with a black tip instead of a white. Next time, I might do a white nail with a yellow micro French tip (like the picture above).
How to DIY a micro French manicure
If you’re trying to do this at home, I’d recommend this French manicure hack. Basically, you would shape your nails and use your neutral base. For base polish, Julie recommends OPI Bubble Bath and Glass recommends a few coats of GLOSSLAB polish in OG Sheer Pink.
Then, pick the polish color you want on your tip, white or whatever. If you have a silicone makeup sponge (this one by e.l.f, is good), use that as your palette and paint the secondary polish on top. Gently press your nail into the painted part of the silicone. The polish will stamp onto the tip of your nail. Gentle is the operative word if you want to make the line as thin as possible. It’s not perfect, but hey, it’s a hack.
You could also try using a tiny brush to outline the tip of each nail. Julie recommends a size 1 liner brush like this one. If you accidentally go too thick with your line, no worries — you’ve just gone for the traditional look.


